Learn the steps to make simple beaded earrings
It only takes a few simple steps to make earrings from beads or small pendants. Watch my video to see how it’s done! I also provide online sources for many of the findings and beads you need to make your own creations.
Make great beaded jewelry with just these 5 essential tools: a wire cutter, a chain nose plier, a round nose plier, blue tape and a TOWEL! These are the only tools you really need to make all kinds of necklaces, bracelets and earrings. Click here to review the 5 Essential Beading Tools Video.

Transcript
For those of you that would rather read the transcript:
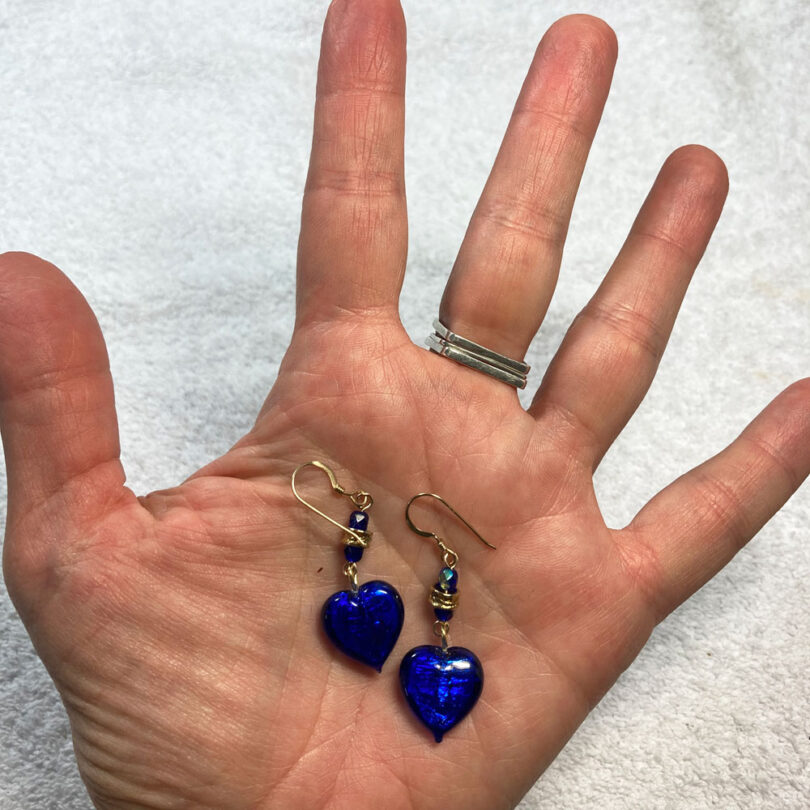
In today’s Five Essential Beading Tools video, we’re going to be looking at how simple it is to create your own earrings. I have these really gorgeous blue heart pendants. They’re glass lamp work and they have a silver foil material inside that makes the glass look extra specially shiny. Since they’re pendants and they already have a loop on top, I could just put that on an an earring wire and close that up and I would just be done. Certainly you can do stuff like that – very simple.
But I have kind of long long hair and a small earring like that is just not going to show up very well. So I’m going to show you what I would do to make that longer. I have an eye pen: an eye pen is just a kind of stiffer wire pin with a loop that can be opened down here. It’s fairly long so I can make kind of a dangle or a pendant.
The Beads I Selected for my Earrings
I’ve picked out some beads that go with my blue glass pendants: these are 4 mm Czech glass Cobalt beads with an AB finish. ‘AB’ means Aurora Borealis, so it’s kind of a coating that makes it shiny.Then I have a gold-plated pweter bead that’s kind of like a disc and then I’m going to use one more of the Aurora Borealis blue beads and I’m going to stack that above my heart pendant so that it hangs down a little bit farther and has a little bit more movement on the earring.
Making a Link Between the Pendant and the Earring Wire
Now we’re going to take this little stack of beads on the on a pin and turn it into a link so it can go between our ear wire and our pendant. The way you do that and some of this comes with you know just experience of doing this a long time. I need to make a loop that’s the same size as what’s on the other end of the beads. I need to cut this pin off and you kind of get used to how much material you need. When you’re starting you should probably leave a little bit too much and then you can you know nibble off the amount that you need to to get the loop to end up the right length. I’m going to go with just a little under a half of an inch and cut that off.
Then I’m going to take my round nosed plier and I bend back against my thumbnail and just twist a loop. You can see that even I made it just a little too long. So that’s good: we’re going to show how you adjust that length. Cut just a little bit more off, put your round pliers back in there give it a turn until you have loops that are the same size. Let me hold it with something else you can see it. Loops that are similar in size on both ends.
You can also see that they’re not really lined up the same way so I can take the loop on one side in my chain nose pliers and my round nosed pliers on the other side and I can just line those loops up. They’re going the same direction.
All right now, we hook everything up
You open the loop on this link to the side – we don’t open it outward because we don’t want to deform the shape of the loop. We open that to the side, hook it to our pendant, and then close it back down so that it’s loop again. Then on the other side you can either open the loop on the link or you can open the loop on these ear wires. They tend to have the opening on the inside or the back, but various ones are designed in different ways.
We’ll keep it simple. We’ll just take that link that I just made, bend it to the side to open up the loop, slip the ear wire on there, and close it up!
Now if you have a pendant that has a front and a back, you need to be careful which way you align it with the the ear wire on top, but mine are the same all the way around. In fact, they’ll kind of spin a bit so it doesn’t make any difference in my case.
Using the Entire Gold Filled Eye Pin
Now you can either start with two short eye pins so that you don’t have to form the loop on either side, or like in my case, my eye pin is fairly long. I can just use the part that I cut off to make the loop and then I will stack my beads on this. I have enough material here that I don’t have to use a second eye pin. I’m going to talk in the notes a little bit about the kind of findings that I’m using. This happens to be a Gold Filled finding so they’re a little spendy and you want to get the the most you can out of each one. I’ll link these in the notes so you can find them if you want to do Gold Filled. You can see that there’s plenty of material here. In fact, I’ll have to cut a little bit of the pin off the end to form the last loop.
I’ll link you over to similar findings in Gold Plated which is much more affordable and probably the thing you’ll want to start with when you’re just getting used to doing beading. That way you can practice on some findings that aren’t quite as expensive and kind of get the hang of where to cut the wire to make the loop and so forth. I’m just kind of snugging this up so that it is round. Once again I need the loops to go the same direction, so chain nose on one side, round nose on the other. Just adjust that so they’re going the same direction.
Gold Filled vs. Gold Plated
I decided on this project to use gold colored findings because my pendant beads have this brass loop going through the bead. I wanted to stick with that gold color. When I use gold findings I like to use what’s called Gold Filled, which means this has 14 karat real gold bonded onto the outside of the finding. It’s still only one-twentieth of the total weight of the material which keeps it more affordable than karat gold but it retains its gold appearance through the the life of the piece.
I have Gold Filled jewelry that I’ve been wearing for 20 years on a regular basis and it still looks gold. It’s still gold colored when you clean it. It shines up and looks great. Whereas if if you use gold plated findings, that gold color is going to wear off in a really short period of time, even within a few weeks. Sometimes it lasts longer than that and I’ve mentioned that in my parts notes. I find that spending the extra amount of money for the Gold Filled is going to allow me to enjoy these earrings for many many years to come. I hope you enjoy enjoyed learning how to make a simple pair of earrings!
List of Beads I Used in the Video
For this Earring project, you need:
- 2 Pendant Beads. I used Lampwork Silver Foil Heart pendants that are about 16mm in size.
- 4 Czech Faceted glass beads in the 4mm size. Mine are Cobalt AB.
- 2 Pewter Disc beads, about 6mm diameter, with a durable Gold Plated finish
- A Gold Filled Eye Pin, 24ga, 2 inches long
- 2 Gold Filled Earring wires – mine are the ‘coil only’ style
Source for Similar Beads
There are so many beads in the world, but sometimes it is hard to find the exact same ones as you liked before. The supply chain is pretty variable in the bead business. You’ll want to create your own beaded earring design in any case, so these links are intended to just get you started looking at things similar to what I used.
I got my Cobalt Blue Heart shaped Lampwork beads years ago, and I am not finding anything like them at the moment. The closest item I can direct you to are these Ruby Red Silver Foil Lampwork pendants. They come in a package of 2 (perfect for earrings!) and have the brass top loop just like the ones in my video.

This will take you to the exact Cobalt Blue AB coated beads that I used in the video. Since you'll probably want to pick your own color scheme and design, this will just get you to a place where you can start exploring the beautiful world of beads.

These pewter beads are a different shape than I used, but I am linking to them because they are the same QUALITY of bead that I use. I've used products from Tierracast for almost 20 years and have found them to be great products that hold up well in my designs. The plated finishes (of whatever color) are thick and won't wear off quickly.

Source for Gold Filled Findings
Be very VERY careful buying Gold Filled findings online. I have seen listings that say ‘gold filled’ but based on the price, the findings just have to be the plated variety. At the time of writing this post, Gold Filled eye pins run a dollar to 2 dollars a piece, depending on length. Items like Earring Wires or Clasps tend to be stamped “1/20 14K” if you know where to look for the stamp, but eye pins and head pins usually are not stamped with the “quality”.
This is a package of four Gold Filled Earring Wires - enough for two pairs of earrings. This is the simple 'coil only' style of French Earring wires. The supplier also sends 4 nylon backs (nuts) to avoid losing your earrings. Zoom in closely on the first picture in the listing and look at the left ear wire: you will see in the center of the round wire portion that it is stamped appropriately for 1/20 14kt Gold Filled jewelry parts.

This package has 12 Gold Filled Eye Pins that are 2 inches in length. I needed only one of these pins for my earrings project because it was long enough to form two links.

Plated Findings List
Please see the post on Economy Plated Findings for sources of Plated Earring Findings that are similar to the items I used in the video.
Table of Contents
If you are looking for other earring creation ideas, you might be interested in this article: New Earrings from Old: Vintage Earrings. In it, I show how I used some fabulous vintage clip earrings to source interesting Czech pressed glass beads to create a modern dangle earring design. Speaking of sourcing jewelry beads and parts, I tell the story of finding those clip earrings in Thrift Shop Junkie: Oakland & Berkeley California.