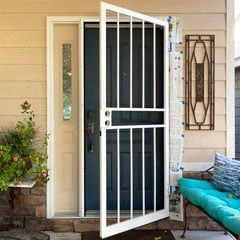
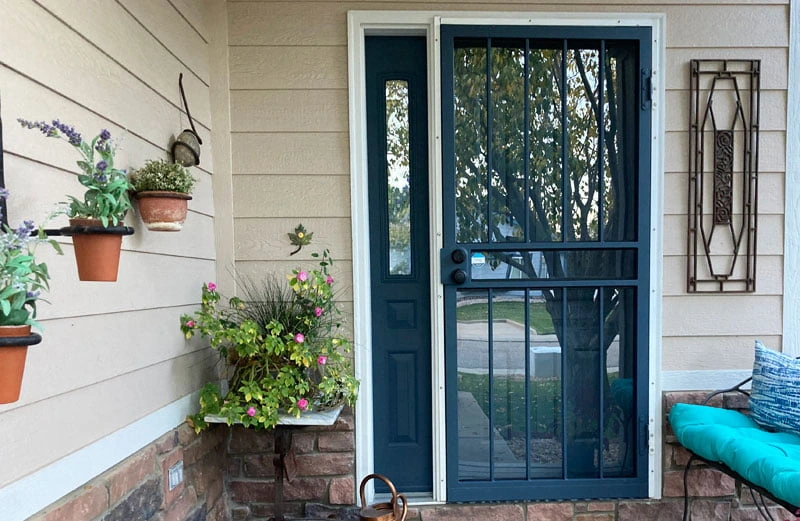
Painting your front door can be an inexpensive way to brighten up the entrance to your place and can even enhance it’s value! I recently decided to take the leap – not only painting the door, the security door and the side panel, but changing the color to something more design forward.
Follow my journey to discover the tips and tricks to ending up with a front entrance to envy.
I Decide to Paint My Front Door
Before and after pictures are definitely a must (don’t forget to take your own pictures). The color of my front door was okay – but what I really disliked was that the contrast between my door and the security door made my front entrance look a bit like a prison cell.
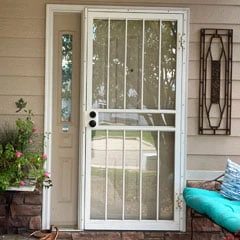
The vertical bars on my security door made my entrance look pretty oppressive. Time for a change!
It seemed to me that the best way to fix the unfriendly entrance was to paint the front door and the security door the same color. I could do less work and just paint the security door the same tan color as the door and side panel, but if I were going to do it, I decided to go for something a bit more fun.
Getting Ready for the Front Door Painting Project
Choosing a Color to Paint My Front Door
Choosing a new color for your front door is one of the most fun parts of the project, at least for me. Some people stress over this step, especially if you are thinking about going with a really bold color like red. Fortunately, these days you can just give your ‘before’ picture to an AI and ask it to generate an image that shows it with the door painted the color you are thinking of.
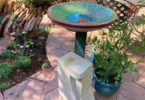
I knew that I wanted something in the dark blue family to coordinate with some of the other parts of my home and the color of garden items like my DIY Rain Barrel.
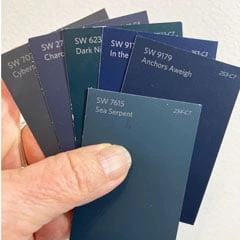
I ended up picking Sea Serpent – a color from Sherwin Williams. I like the color swatches at the Sherwin Williams store because their color designers have done a really good job of putting the colors into ‘families’ of colors that work well with each other. I also like how the color selection portion of their website works.
All paint stores that I know of have ways to buy smaller cans of paint as samples, if you feel the need to try out bigger areas of paint first. Sometimes it is hard to tell from looking at 2″ swatch. Be sure to view the color in both sunlight and shade before finalizing your choice.
Choosing the Type of Paint
When I was a kid, my father taught me that when you painted wood, you used Latex (water based) paint. When you painted metal, in particular metal that was outdoors like a hand railing or metal door, you were supposed to use Oil based paint. When I asked for exterior oil based paint at the store, I learned that this type of paint is “not a thing” anymore, at least in Colorado. Oil paint, and cleaning up the tools with mineral spirits was bad enough for the environment that the Colorado legislature made it something that you can no long buy.
I asked the guy at the store about what I should do. He said that there are Direct To Metal (DTM) paints available, but that most people with bare metal use a primer made for metal (but that is water based). Since my door and security door have already been painted at least once, he told me that I could just use normal exterior latex house paint.
I would also encourage you to use the best paint you can afford. The difference between the low end paint and the really good stuff that has a 10 year warranty might increase the cost by 25 to 30%, but you’ll be a lot happier with it. You’ll get smoother coverage so you will potentially finish the job with 2 coats instead of 3. The paint will last longer, chip less and hold up to UV better (less fading or discoloration).
Exterior paint is typically available in either Low Luster (flat/matte) or Satin (more shiny, but usually not to the point of being reflective). This is a design choice. I went with the Low Luster because I thought it would blend in better with my entrance. Even if your entry door is in a protected porch area, you still want to use Exterior grade paint. Interior paint will not hold up to the temperature and humidity changes that outdoor surfaces need to endure.
So, to sum it up, I bought:
- Exterior Latex Paint
- Low Luster
- Top end grade, which at Sherwin Williams is the “Emerald”
- Custom Color
How Much Paint Does it take to Paint a Front Door?
If you are just painting one front door you can get by with a quart of paint. Since I was painting my front door, both sides of a security door, and a sidelight I felt safer getting a gallon. Since the door paint color is close to some accent painting elsewhere on my home, I thought I could use any leftover paint for future projects.
As it turned out, when I finished the project I learned that a quart would have been enough but it would have been close. In my view, it was better to buy the gallon and not stress during the project.
Preparing the Front Door for Painting
To get started, the first step is to throughly clean the area you are going to paint. Exterior surfaces get really dirty! If you have a power sprayer, you can blast off the dirt (that is certainly what professional painters do).
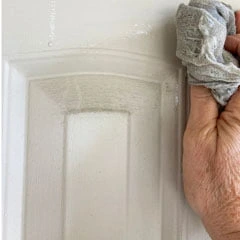
I just scrubbed the door with a wet rag and plain water. If the door is hard to clean or sticky, you can add a bit of Dawn Dishwashing detergent to the water. Don’t overdo it – bubbles on the surface of the water are fine but try to avoid loads of foam.
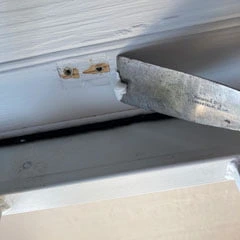
Take the opportunity to fill in any holes or blemishes in the painting surface. In my case, I removed some old hardware from a door return that had broken. If you see any old drip marks from a previous (poor) paint job, you can usually remove them with a razor blade (single edge variety) or a sanding block.
Holes can be filled in with paintable exterior caulk. I like a product called ‘Alex’ that is easy to apply, has a many year warranty, and is paintable within about 30 minutes. I’ll link it in the Supply section below.
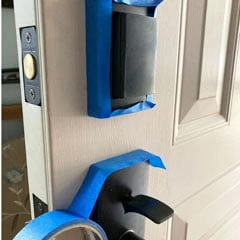
Mask all of the hardware on the door: deadbolt, door handle, hinges, etc.
I was not painting the interior of my front door, so I also masked the sides of the door so I would have a nice clean line.
Use good painters tape for this step and press down the edge firmly to avoid the paint leaking underneath the tape. Good tape will give you a cleaner paint line, less touchup later, and will come off without tearing the old paint away on surfaces. Tape like old fashioned masking tape can also leave adhesive on surfaces if left in place too long – or if it gets heated up by the sun.
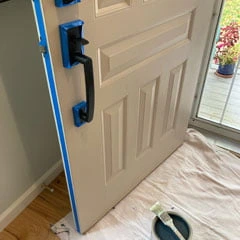
Here is my front door, all ready to start painting. Be sure to use a drop cloth below the door. No matter how careful you are, there always seem to be a couple drips. If you don’t have a drop cloth, an old sheet can make a good substitute.
Painting My Front Door
Drum roll! It is finally time to paint!
Stir the Paint
I had brand new paint from the paint store, so I didn’t need to stir the paint before starting. If you are using existing paint that you have on hand, be sure to stir it really well before painting. TIP: Most paint stores are happy to put your can of paint on their shaking machine, because people who visit stores sometimes pickup some last minute supplies. Be kind though and go to the right store: don’t be that person who takes Behr paint to Sherwin Williams.
Paint the First Coat
While putting the first coat of paint on your front door, your focus should be even coverage. Don’t worry too much about slight areas where the old color shows through and avoid the impulse to go back and ‘fix’ areas that were previously painted. No matter how evenly you spread the paint, it tends to dry unevenly. When it is completely dry it will look smoother.
At first you can apply paint in any direction to fill in cracks or grooves, but all finish brushing should all be in the same direction (up and down – or – side to side. Don’t change direction for different parts of the door. I go up and down since most of the grooves in my door are vertical. Since most doors are taller than they are wide, up & down brush strokes are probably the best choice.
I tend to start at the top of a door and work my way down to the bottom. While you are painting:
Do fix: Drips. If you see drips, you are using too much paint. Smooth out any drips you notice, then lightly over-brush to blend the paint into the rest of the painted area.
Do fix: Debris. Remove any fuzz, dirt, spider webs, brush bristles that come off - anything that makes a bump in the paint. After removal, lightly over-brush to blend the paint into the rest of the painted area.
Keep a damp rag or paper towel handy for cleaning up drips or over-brushing.
Do let the first coat dry completely. I like to wait about 24 hours at a minimum.
Do a Good Job Cleaning Your Brush
The better you clean out your brush, the longer it will last. It will also be easier to work with by applying paint more smoothly.
Rinse it in running water, rubbing the bristles with your fingers until you can’t see any more color coming out of the brush. Pay good attention to the part of the brush where it is attached to the handle. Spreading the bristles apart while rinsing will usually yield a bit more paint color running out. I also bend the bristles against the bottom of the sink in both directions.
Now shut off the water and shake the water off of the brush into the sink (or onto the ground outdoors). Once again, if you see any hint of color, go rinse the brush again.
Prop the brush up so that the remaining dampness will dry.
Paint the Second Coat
During your second coat of paint (and any subsequent coats), your focus should be for flowing an even coat of the paint onto the surface. You want just enough paint so that you can feel the brush sliding on the paint surface instead of dragging. Keep an eye out for any drips. Work from the top of the door to the bottom, finish brushing as you move from area to area. Don’t try to go back and fix areas that are done. Do remove any debris (as mentioned above) and over-brush lightly.
If you bought good paint and applied it evenly, you probably will not need a third coat. You might see small areas that you want to touchup though, so make sure you are happy with the paint surface before removing your tape and masking paper. In my case, I was able to get a good application with two coats.
Remove Masking Tape & Touch Up
When the last coat of paint is completely dry, carefully remove any tape you used to protect the door hardware. Sometimes if you are having trouble getting the tape to pull away from the painted surface neatly, running a utility knife or X-Acto blade along the edge can help.
If you see tiny areas that need a touch of paint, it’s best to use a small artist paint brush instead of the bigger brush you used for painting your front door.
Wash. Rinse. Repeat.
For my project, I now repeated the entire process for my security door, and then for my door sidelight panel. On my security door, I decided to remove the door hardware before painting instead of trying to mask it.
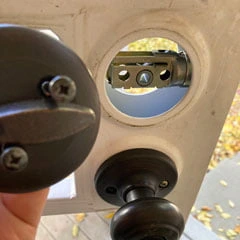
While you are removing any hardware before painting your front door, take pictures as you remove pieces. This may help when you are putting them back in place. For instance, on my deadbolt, the interior piece has an ‘Up’ direction to get it to lock correctly.
Notice in this picture that I have taped up some old newspaper around the trim that I don’t want to paint. I also tape around the hinges of the security door to get a neat paint line.
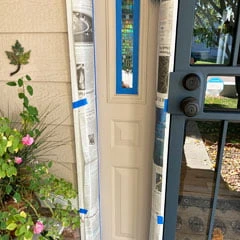
The side panel near my door will also be painted dark blue. If you don’t have newspaper available to protect areas you don’t want to paint, they make inexpensive brown paper in rolls that can be used instead – some versions come with tape on one edge, but I’m not sure how good the tape is because I haven’t used it.
That glass window in my door side panel above has rainbow hues due to some great privacy film that I installed in another home improvement project: Convert any window in your home into a Privacy Window.
Frequently Asked Questions
What time of year is best for painting your front door?
The best time to paint an exterior door is when the outside temperature is close to 70°F. When the weather is in the range of 60°F to 80°F you will have the best results of the paint drying well and going on smoothly.
In many parts of the country, that means that Spring and Fall are the best times for outdoor painting projects, but of course this will vary in extreme North/South locations or on the coasts. Also try to avoid rainy or windy weather.
Why not use a small roller for painting your front door?
While small rollers can apply a smooth paint layer, there are some downsides to using them to paint a door.
> You still usually need a brush to apply paint to small or tight areas. They don’t roll into corners completely.
> The grooves in the surface of my door are hard to fill in without a brush. If you have a completely flat door a small roller might work for your job.
> Using both a brush and a roller is more stuff to clean up. Cleaning rollers takes more time and more water than cleaning a brush.
> Rollers tend to splatter more paint than a brush does.
Why not spray paint my front door?
Applying spray paint can be really fast. The problem is that preparing for spray painting can take so much extra time to mask and protect everything on and near the door that you probably will take more time overall than brush painting. Either that or you will have lasting paint reminders on other stuff (the frame, the steps, the deck, the flower pots …)
Paint that comes in spray cans is not as durable for exterior uses as good house paint and the thickness of application tends to a lot thinner. If you try to apply too much paint at once, you will get a lot of drips. Applying many thin coats will result in a better appearance. There are paint sprayers that can be rented for use with exterior latex paint, but they tend to have issues with plugging up, applying paint uniformly and they use a lot more paint (mostly through overspray and waste).
Source for Painting Supplies
Of course, everything you need for painting your front door can be found wherever you decide to buy your paint. I find the supplies rather spendy at those places though. From the look of my canvas drop cloth, you can see that it has helped me through a number of projects. Some of you might just be starting out in your DIY journey, so here are some solid painting tools and supplies that you might want to pick up for this project and future ones.
This fast drying white caulk that everyone calls "Alex' can be used inside or outside for you painting project. Fills holes and gaps at the tops of baseboards and more. This 'fast dry' variety can be ready to paint in as little as 20 minutes. You will need a caulk gun to use this product, but the same caulk is also available in squeeze tubes for small projects. 10.1 ounce cartridge.

I love Blue Tape. You will find me using it in a number of the ‘How To’ articles on this site, including in my beaded jewelry posts. Blue Tape is one of my essential beading tools in 5 Essential Beading Tools.
This is a multi-pack of Scotch Blue Painter's tape - a 3M product. You get four rolls of 1" wide tape. Also available by the single roll or by the case - and in a 2" wide variety. Not just for painting, this tape is useful for many projects so I always keep a supply on hand.

A 2 inch wide paint brush with an angled edge - also known as a 'sash brush' is a versatile paint tool that is useful for a wide range of DIY painting projects. What I like is that it is not only angled, but the bristles are also chiseled, which means they are cut at an angle from front to back. Wooden handle and soft polyester bristles.

A Canvas drop cloth can last a lifetime – such an eco-friendly choice and it definitely qualifies for #bifl (build it for life)! Mine must be over 30 years old. So much nicer than plastic.
A canvas drop cloth in a useful 4 foot by 12 foot size (but several other sizes are available). These are reusable for years and can be washed if desired.

This razor blade holder tool is a convenient way to hold a single razor blade at the right angle for a number of tasks, including cleaning paint off of glass or grunge off of your grill. I like this one because it fits well in my hand, comes with 15 blades, and the extra blades can be stored inside of the tool itself. This link leads you to a Red one, but other colors are available.