Learn how to easily Extend the Length of Necklaces and make them adjustable length
Do you have a necklace that is just too short? Or maybe a necklace that you want to wear at different lengths to work with different clothing or to layer with other necklaces? This short video will show you exactly how to do that and which tools you will need.
Necklace Stacking
Necklace extenders not only allow you to wear a single necklace at the right length to match your clothing, but they can be used to add a necklace to a stack. The term “stack” is the word for an on-trend jewelry fashion: layering many different necklaces together, with each one hanging at a different length. Adding your own custom length extender to each necklace in a stack can result in the perfect necklace arrangement.

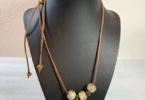
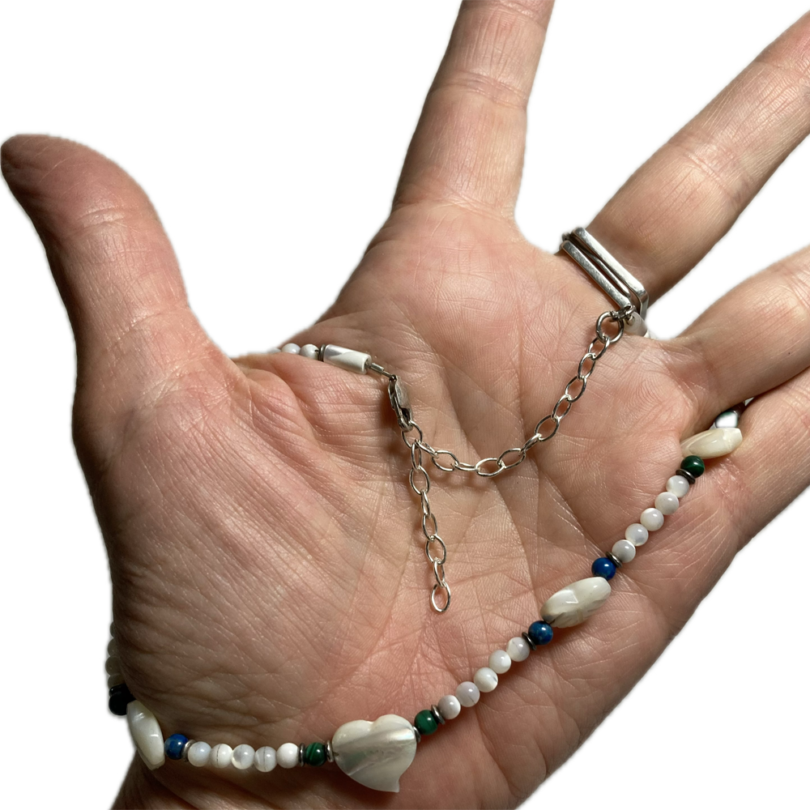
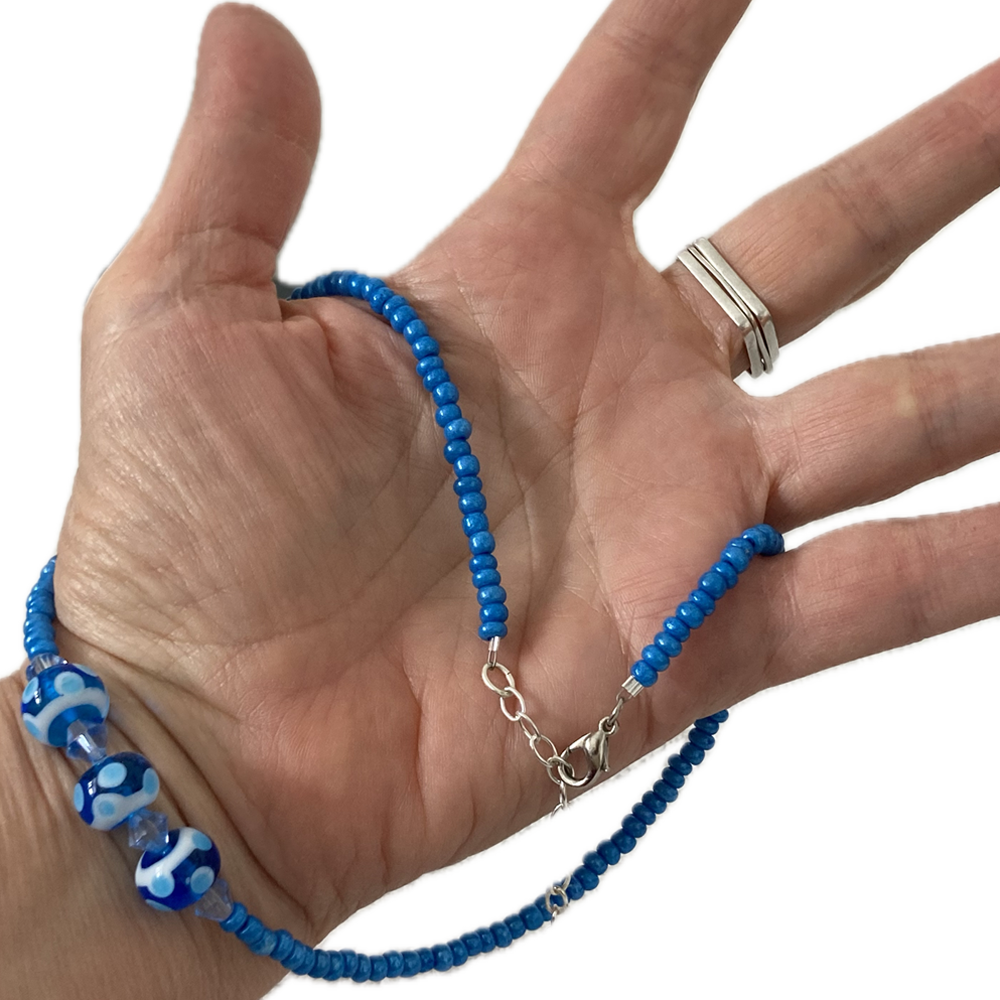
We’re going to be looking at a project where we’re going to make a necklace longer. My daughter made this little choker necklace out of mother of pearl and Lapis but she got it just a little too small. We’d like it to be a little bit longer without having to restring it.
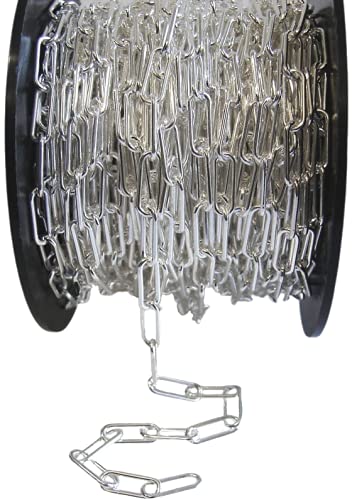
The clasp on this necklace is hooked right to the beading material so we’re going to leave that side alone and we’re going to work with the the Ring side of the necklace. What we’re going to do is to add an extender with some silver chain that matches the clasp.
Make the Necklace Extender
I’m going to cut a piece that’s about 3 inches long. The tools that we’ll need today for our project are a pair of wire cutters (mine happen to be a flush cut but you can also use an angle cut pair). It’s not going to make any difference on the what we’re doing today because we’re just cutting a ring.
Tools That We Need
Then we have a a pair of needle-nose pliers – they’re also called chain nose pliers sometimes. They have a flat smooth surface on the inside of the plier so that they don’t gouge the jump rings or the chain or the jewelry. Typically what you’ll also have in in your jewelry set is a pair of round nose pliers – those will work. In my video I’m using two pairs of the the flat chain nose pliers which is the easiest thing because that flat surface works really well against the ring. So those are the tools that we’ll need for today’s project.
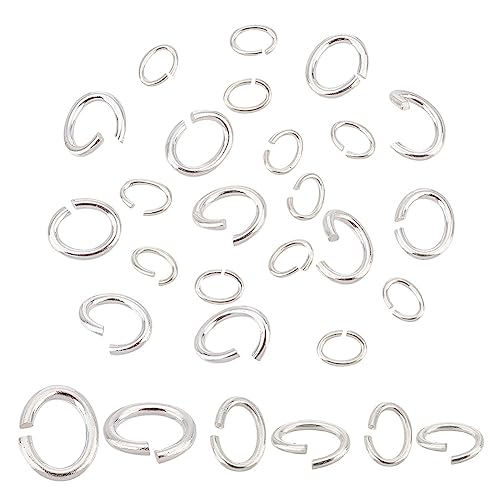
Here I’m just using some jewelry flush Cutters to cut out one of those rings and this will be our necklace extender. Then the way that we connect that to the existing necklace is to use something called an open jump ring. I Source a lot of my parts from thrift stores from existing jewelry that I take apart, but you can also order these online. What you want to search for is 6 mm OPEN jump ring.
Open Jump Rings – The Soul of Beaded Jewelry Construction
When you get these rings from the store or online they look like they’re one
continuous ring but if you rub your fingernail along there you’ll find a place where it’s rough and that’s the open part of the jump ring. be sure not to get closed jump Rings because they don’t have the opening.
Now this is the critical part! Most people want to pull that ring apart so that it deforms the circle. Instead, you grab with flat needle nose jewelry pliers and you just twist your wrists to create the opening in the ring. Then we’ll put the necklace with the Ring Side onto that ring. We put the Extender on that ring and then we just reverse the process. Grab each side do a twist and kind of wiggle and push when it the ends get close to each other so that you have a nice tight ring closure there to hold the extender onto the necklace.
Attach A Clasp
Then we can take our clasp and connect it anywhere along the chain so that the necklace is exactly the right length to go along with whatever we’re wearing at the time.
This technique works with any length of necklace that needs to be just a little bit longer. It hangs on the right place above your neckline or below the neckline so that the jewelry looks good!
Jewelry Parts you will need:
To make your necklace longer, you need:
- 2 – 6x5mm Oval Open Jump rings
- Chain: I used silver chain with loops that are 7mm x 5mm, 3 inches.
Note that your necklace will look the best if you match your new findings to the existing necklace finding material. Common choices are Sterling Silver or Gold Filled findings for ‘artist level’ pieces (such as a piece you bought at an Art Fair), but if you want to economize, Silver-plated or Gold-plated findings are also fine to use. In the last few years, findings in Solid Copper, ‘vintage’ Brass, and Gunmetal (black) have also been popular.
If you are repairing jewelry that was made with Sterling Silver components, as I am demonstrating in the video, you may want to use Sterling Silver replacement parts. This set includes three common sizes of oval jump rings: 8x6mm, 6x5mm and 5x4mm (10 rings in each size). In the video, I was using the medium size.
This Sterling Silver (925) chain is made in Italy. It has links that are a perfect size for making necklace extenders: 11.4 x 4.2mm, and has a material thickness of 1mm. It is sold in lengths of 3 feet.
If you are repairing costume jewelry and just need economical rings, this set of plated rings comes in three color (silver plated, gold plated and antique bronze plated). You get four sizes of oval rings in each of the colors. The kit contains 1860 pieces (you may never need to buy rings again) and they come packaged in a case to keep things sorted.
Please be aware that ALL plated findings (no matter who makes them) will eventually have the plating wear off. If this is a problem for your project, consider paying the price for Sterling Silver or Gold Filled findings.

This is a steel (silver colored) chain that has links large enough for use as an extender: 7mm x 3.3mm. It is also available in several other plated finish colors (including black). If the clasp on your necklace is fairly large, consider buying the 12x4mm version of this chain.

Need Help with Beading Tools?
Great beaded jewelry can be made or repaired with just these 5 essential tools: a wire cutter, a chain nose plier, a round nose plier, blue tape and a TOWEL! To learn more about the only tools you really need to make all kinds of necklaces, bracelets and earrings, click here to review the 5 Essential Beading Tools Video